# Zitadel as IDP for OIDC-SSO
To set up the IDP you need a running instance of Zitadel.
# Preamble
The Enterprise Edition (EE) server and client support the OIDC protocol that allows you to configure an external service as IDP (identity provider) for SSO (single sign on). This guide here will explain how to configure Zitadel (opens new window) as OIDC-IDP for SSO. We assume that:
- your Zitadel instance is running on https://test.zitadel.cloud
- your webclient can be accessed on https://psono.example.com
- the server is reachable at https://psono.example.com/server (e.g. https://psono.example.com/server/info/ shows you some nice json output).
This is your first OIDC provider that you want to configure (therefore we give it the ID "1").
TIP
This feature is only available in the Enterprise Edition.
# Zitadel
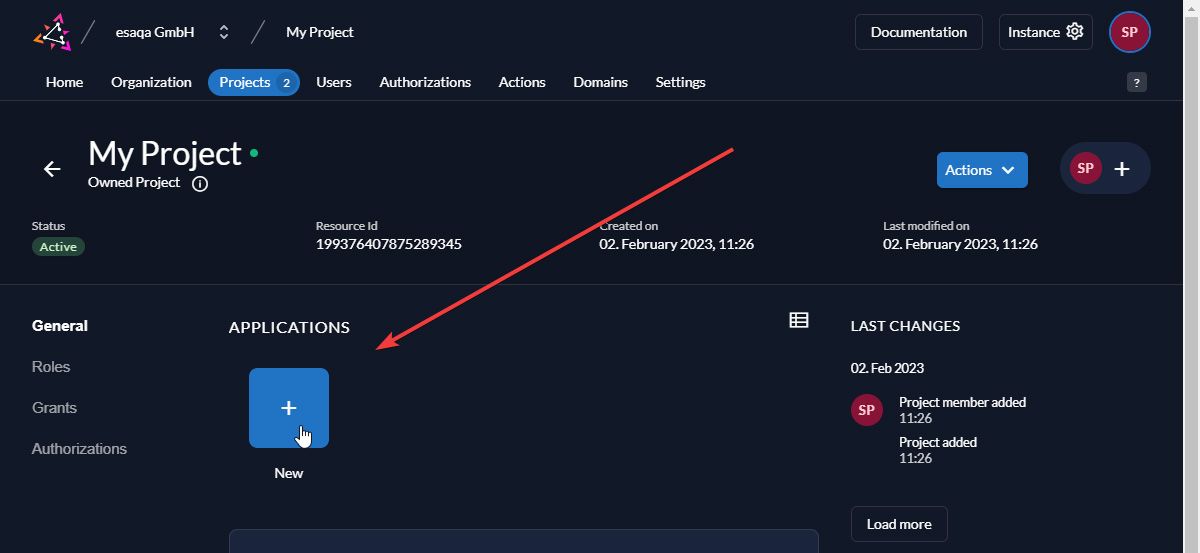
Create a new application
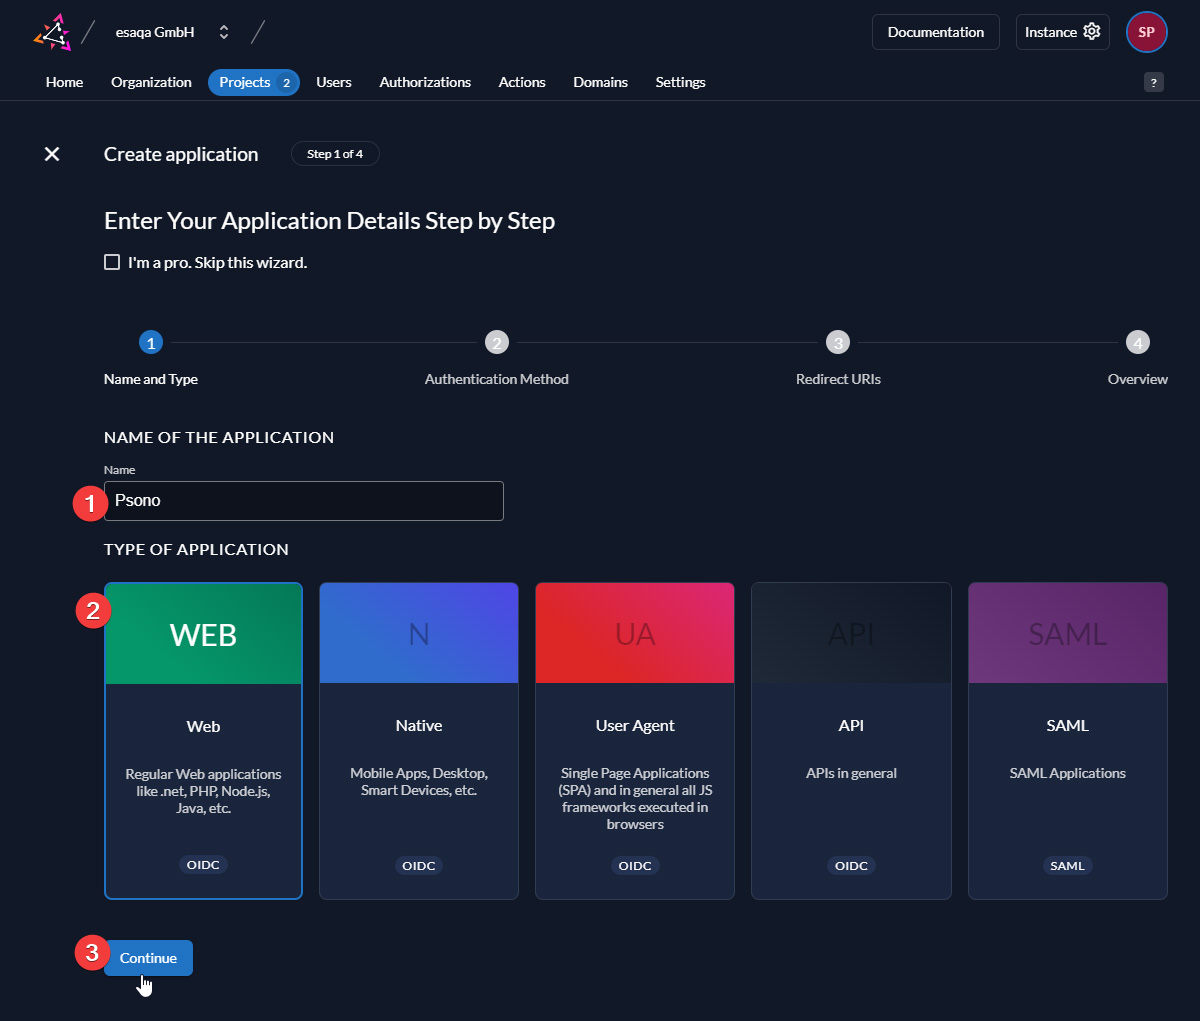
Configure the application
Specify a name and select "Web" as type
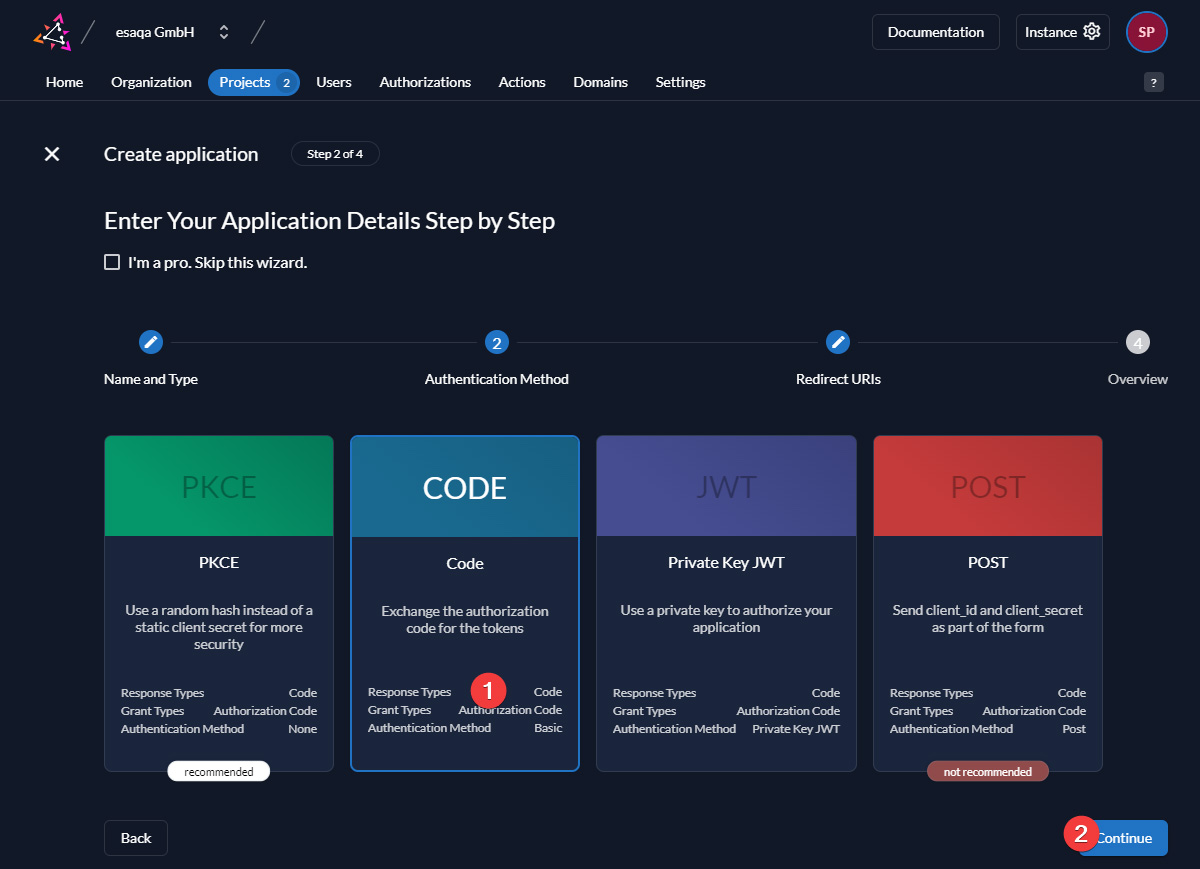
As authentication method choose "Code"
Add
https://psono.example.com/server/oidc/<provider_id>/callback/as redirect URI (adjust accordingly).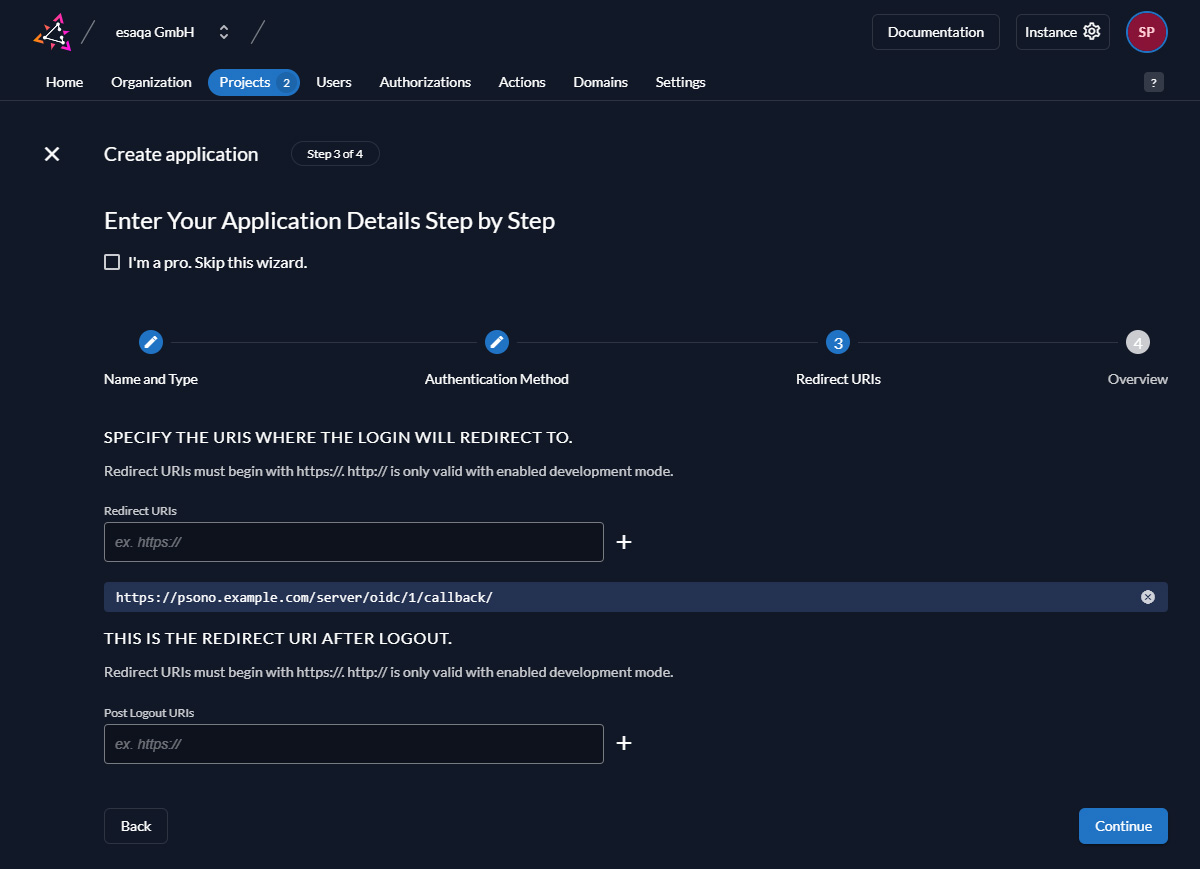
Check that the overview matches now the one on the screenshot.
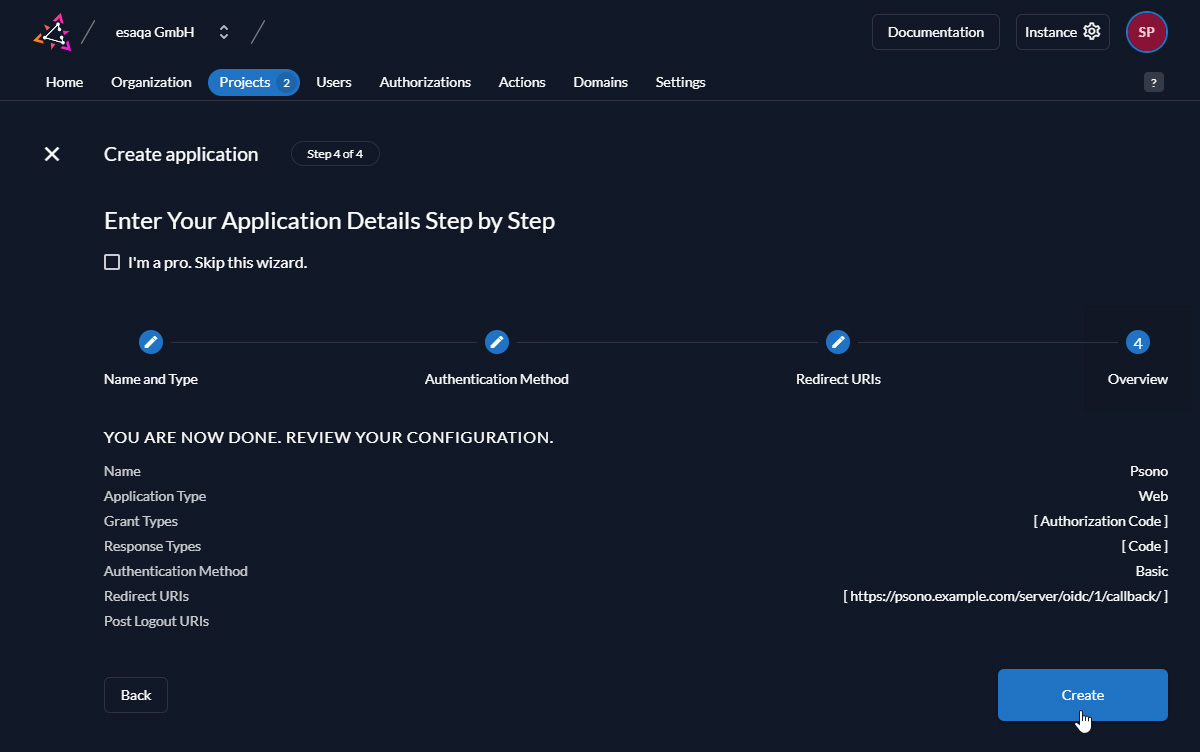
Copy the client id and client secret. We will need them in the next step.

Add roles
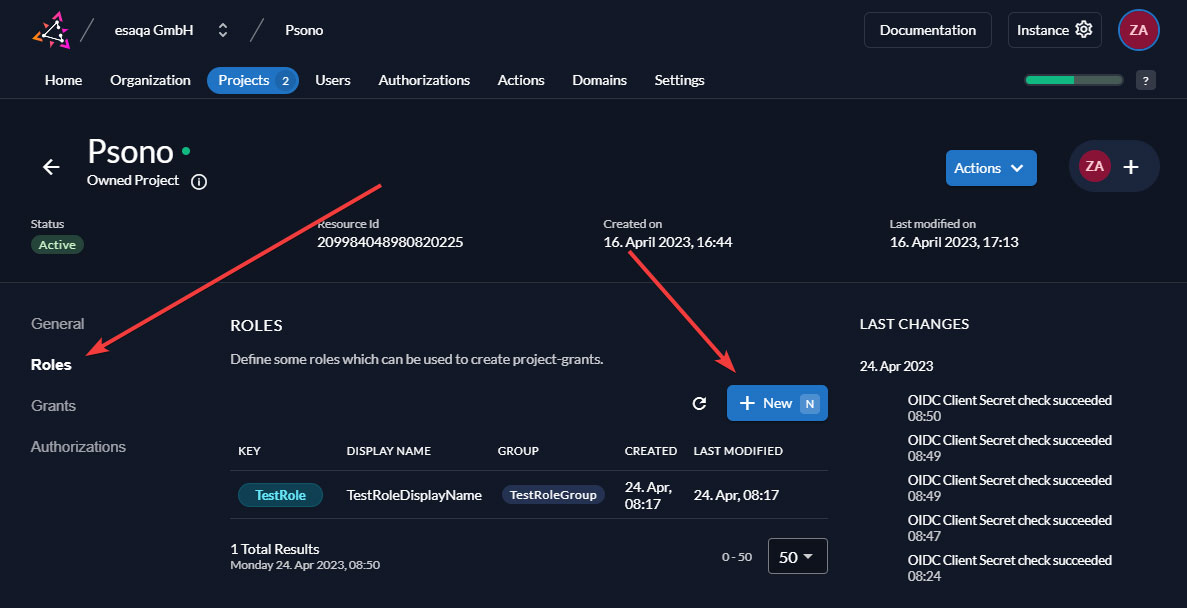
To create a role (or group if you want to call it like that) click on the left side on "Roles" and then click on the blue "New" button in the middle.
Add Authorizations
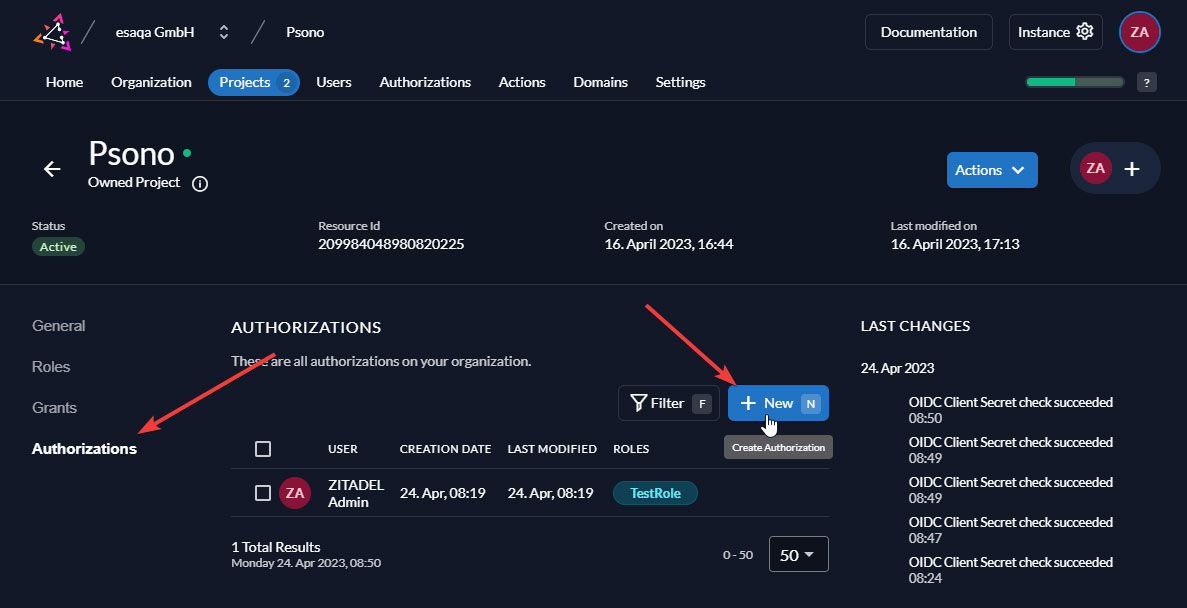
To assign roles to groups click on Authorizations on the left side of the menu and then again use the blue "New" button to assign a role to a user.
Create Action
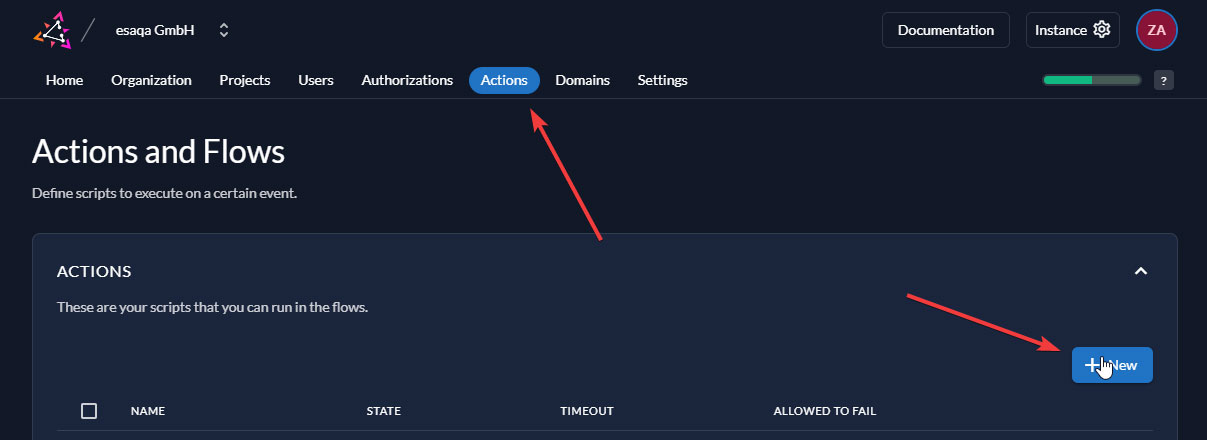
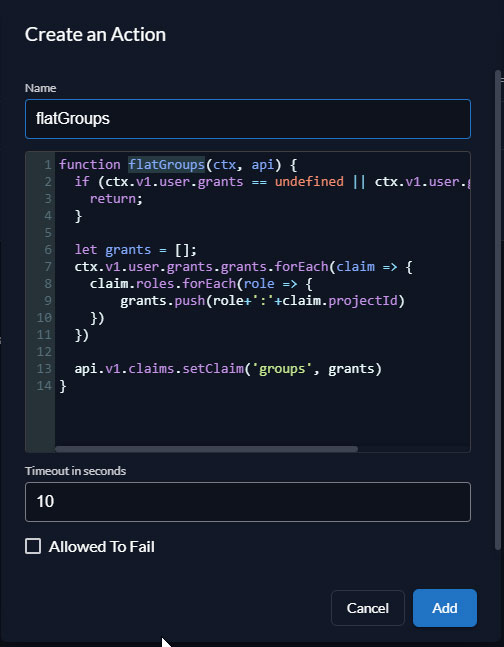
At the top click on Actions and the nagain use the blue "New" button to create an action.
Configure the action with the name
flatGroupsand the following content:function flatGroups(ctx, api) { if (ctx.v1.user.grants == undefined || ctx.v1.user.grants.count == 0) { return; } let groups = []; ctx.v1.user.grants.grants.forEach(claim => { claim.roles.forEach(role => { grants.push(role+':'+claim.projectId) }) }) api.v1.claims.setClaim('groups', groups) }It then should look like this:
Configure Flow
At the bottom choose flow type "Complement Token" and then use the blue "Add Trigger" button to configure one for "Pre Userinfo creation":
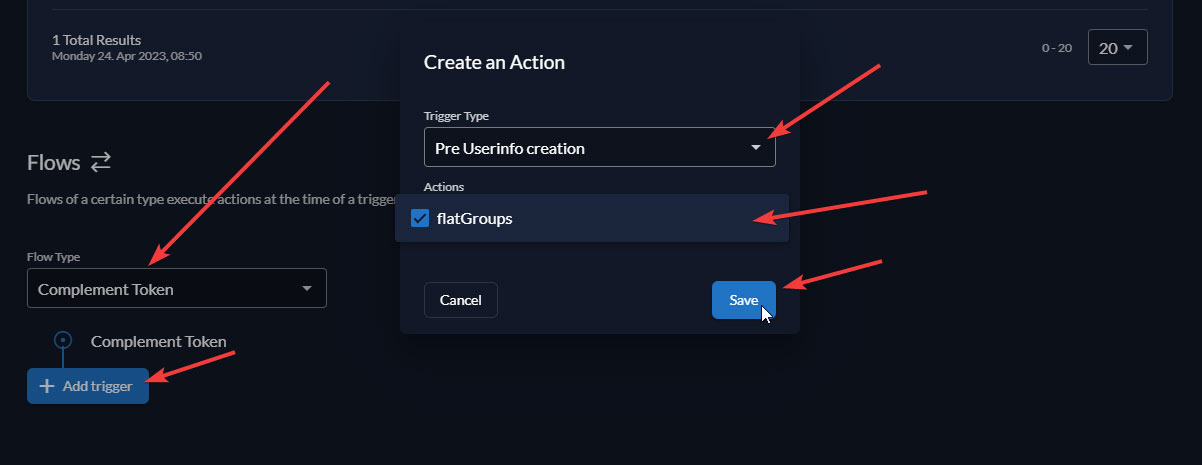
Repeat the process and configure another Trigger for "Pre access token creation":

# Server (settings.yaml)
After setting up the IDP for the OIDC-Authentication it is time to configure your running Psono server to act as the SP. It is required that Psono can reach Zitadel.
- Change or add OIDC configuration in to settings.yaml
OIDC_CONFIGURATIONS:
    1:
      OIDC_RP_SIGN_ALGO: 'RS256'
      OIDC_RP_CLIENT_ID: 'YOUR_CLIENT_ID'
      OIDC_RP_CLIENT_SECRET: 'YOUR_CLIENT_SECRET'
      OIDC_OP_JWKS_ENDPOINT: 'https://test.zitadel.cloud/oauth/v2/keys'
      OIDC_OP_AUTHORIZATION_ENDPOINT: 'https://test.zitadel.cloud/oauth/v2/authorize'
      OIDC_OP_TOKEN_ENDPOINT: 'https://test.zitadel.cloud/oauth/v2/token'
      OIDC_OP_USER_ENDPOINT: 'https://test.zitadel.cloud/oidc/v1/userinfo'
      OIDC_ALLOWED_REDIRECT_URLS: ['https://test.zitadel.cloud/']
      AUTOPROVISION_PSONO_GROUP: False
      FORCE_MEMBERSHIP_OF_AUTOPROVISIONED_GROUPS: False
      AUTOPROVISION_PSONO_FOLDER: False
- The Zitadel endpoints can be found on the ".well-known"-page (e.g. https://test.zitadel.cloud/.well-known/openid-configuration) of your installation. Replace the client id and client secret with the one provided by Zitadel.
- Change
AUTOPROVISION_PSONO_GROUPparameter and set it to true, if you want that Psono automatically creates a corresponding Psono group for any new OIDC group and an appropriate group mapping. - Change
AUTOPROVISION_PSONO_FOLDERparameter and set it to true, if you want that Psono automatically creates a folder with the same name as the group and shares it with the automatically created Psono Group. (RequiresAUTOPROVISION_PSONO_GROUPto be set to true to have any effect.) - Change
FORCE_MEMBERSHIP_OF_AUTOPROVISIONED_GROUPSparameter and set it to true, if you want that Psono automatically checks "forced membership" for every automatically created Psono Group. (RequiresAUTOPROVISION_PSONO_GROUPto be set to true to have any effect.)
TIP
Always restart the server after making changes in the setting.yml-file.
Adjust authentication methods
Make sure that
OIDCis part of theAUTHENTICATION_METHODSparameter in your settings.yaml e.g.AUTHENTICATION_METHODS: ['OIDC']Restart the server afterward
(optional) Server Secrets
By default the server will keep a copy of the user's secret keys to allow people to login without a password. If you want true client side encryption and as such force users to enter separate password for the encryption you specify the following in your settings.yaml. You can also decide later and change that and migrate users during the login or apply this setting only to particular users or groups with policies in the Admin Portal.
COMPLIANCE_SERVER_SECRETS: 'noone'WARNING
If a user loses his password he will lose all his data.
# Client (config.json)
Now you have to configure your client, so your users can use this configured IDP.
Basic
Update your config.json similar to the one shown below.
{
  ...
    "authentication_methods": ["OIDC"],
    "oidc_provider": [{
      "title": "OIDC Login",
      "provider_id": 1,
      "button_name": "Login "
    }]
  ...
}
The variable authentication_methods restricts the allowed login methods. In the example above only OIDC will be allowed and the normal login "hidden". The title and button_name can be adjusted however you like. The
provider_idneeds to match the one that you used on your server.(optional) Automatic login
You may want to "automatically" click on the login button to initiate the login flow. You can accomplish this by modifying the config.json as shown below:
{
  ...
    "authentication_methods": ["OIDC"],
    "auto_login": true,
  ...
}
WARNING
This will only work if you have just one provider configured with only one authentication method. Users won't be able to modify the server url nor choose to register or interact with the login form in any other way.
